こんにちは。じじグラマーのカン太です 。
マネタイズって難しいと痛感しながら、週末プログラマーをしています。
PostgreSQLに格納されているデータの中身を確認したいときってよくありますよね。そんなとき、コンソールを開いてSQLを入力して・・って面倒くさくないですか?
MS Access のUIって、素人にとってはとっても扱いやすいんです。外部のデータベースであっても、リンクしてやればクリックひとつでデータ確認できます。複数テーブルの複合検索なんてのも、クエリを使えばマウスだけで簡単にできてしまいます。さらに、追加クエリや削除クエリ、更新クエリなんてものまで用意してくれているので、SQLなんて知らなくても簡単にデータを操作できてしまいます。
ということで、サーバー上にある PostgreSQL にMS Accessを使って接続する方法を紹介します。
では早速はじめましょう。

クライアント端末にODBCドライバをインストールする
まず、PostgreSQL のODBCドライバをダウンロードします。
http://www.postgresql.org/ へアクセスしてください。
ヘッダメニューの「Downroad」をクリックします。
次に、左サイドメニューの「File Browser」をクリックします。
「Directories」一覧から「ODBC」→「msi」→「versions」の順にクリックしてください。
ドライバが一覧表示されます。下へ行くほど新しいドライバとなっています。
クライアントの環境に合わせて(例:32ビットなら「psqlodbc_13_01_0000.zip」64ビットなら「psqlodbc_13_02_0000-x64.zip」)ドライバをダウンロードしてください。
ダウンロードしたファイルを解凍し、「psqlodbc_x64.msi」を実行してください。
インストーラが実行されますので、任意の場所にオプションは全てデフォルトのままインストールしてください。
無事終了すれば、ドライバのインストールは終了です。
postgresql.confの設定を変更する
次にサーバー側の設定です。「 postgresql.conf」を開き編集します。
# vi /var/lib/pgsql/XX/data/postgresql.conf※「XX」部はインストールしたバージョンです
# -----------------------------
# PostgreSQL configuration file
# -----------------------------
#
# This file consists of lines of the form:
#
#   name = value
#
# (The "=" is optional.)  Whitespace may be used.  Comments are introduced with
# "#" anywhere on a line.  The complete list of parameter names and allowed
# values can be found in the PostgreSQL documentation.
#
# The commented-out settings shown in this file represent the default values.
# Re-commenting a setting is NOT sufficient to revert it to the default value;
# you need to reload the server.
#
# This file is read on server startup and when the server receives a SIGHUP
# signal.  If you edit the file on a running system, you have to SIGHUP the
# server for the changes to take effect, run "pg_ctl reload", or execute
# "SELECT pg_reload_conf()".  Some parameters, which are marked below,
# require a server shutdown and restart to take effect.
#
# Any parameter can also be given as a command-line option to the server, e.g.,
# "postgres -c log_connections=on".  Some parameters can be changed at run time
# with the "SET" SQL command.
#
# Memory units:  B  = bytes            Time units:  us  = microseconds
#                kB = kilobytes                     ms  = milliseconds
#                MB = megabytes                     s   = seconds
#                GB = gigabytes                     min = minutes
#                TB = terabytes                     h   = hours
#                                                   d   = days
#------------------------------------------------------------------------------
# FILE LOCATIONS
#------------------------------------------------------------------------------

# The default values of these variables are driven from the -D command-line
# option or PGDATA environment variable, represented here as ConfigDir.

#data_directory = 'ConfigDir'           # use data in another directory
                                        # (change requires restart)
#hba_file = 'ConfigDir/pg_hba.conf'     # host-based authentication file
                                        # (change requires restart)
#ident_file = 'ConfigDir/pg_ident.conf' # ident configuration file
                                        # (change requires restart)

# If external_pid_file is not explicitly set, no extra PID file is written.
#external_pid_file = ''                 # write an extra PID file
                                        # (change requires restart)


#------------------------------------------------------------------------------
# CONNECTIONS AND AUTHENTICATION
#------------------------------------------------------------------------------

# - Connection Settings -

#listen_addresses = 'localhost'         # what IP address(es) to listen on;
                                        # comma-separated list of addresses;
                                        # defaults to 'localhost'; use '*' for all
                                        # (change requires restart)
#port = 5432                            # (change requires restart)
max_connections = 100                   # (change requires restart)
#superuser_reserved_connections = 3     # (change requires restart)
#unix_socket_directories = '/var/run/postgresql, /tmp'  # comma-separated list of directories
                                        # (change requires restart)
#unix_socket_group = ''                 # (change requires restart)
#unix_socket_permissions = 0777         # begin with 0 to use octal notation

ーー省略ーー
「 CONNECTIONS AND AUTHENTICATION 」の欄に、「 #listen_addresses = ‘localhost’ 」とあるので、「listen_addresses = ‘*’」に変更してください。「#」はコメントになりますので、外してください。また、「 #port = 5432 」のコメントも外してください。
#------------------------------------------------------------------------------
# CONNECTIONS AND AUTHENTICATION
#------------------------------------------------------------------------------

# - Connection Settings -

listen_addresses = '*'                  # what IP address(es) to listen on;
                                        # comma-separated list of addresses;
                                        # defaults to 'localhost'; use '*' for all
                                        # (change requires restart)
port = 5432                             # (change requires restart)
max_connections = 100                   # (change requires restart)
#superuser_reserved_connections = 3     # (change requires restart)
#unix_socket_directories = '/var/run/postgresql, /tmp'  # comma-separated list of directories
                                        # (change requires restart)
#unix_socket_group = ''                 # (change requires restart)
#unix_socket_permissions = 0777         # begin with 0 to use octal notation


ーー省略ーー
変更後はこのようになります。保存して終了してください。
pg_hba.conf の設定を変更する
続いて「 pg_hba.conf」を変更します。
# vi /var/lib/pgsql/XX/data/pg_hba.conf一番下まで行くと、下記のような記述があります。「IPv4 local connections:」の欄に
「host all all all password」
の一行を挿入してください。
# TYPE  DATABASE        USER            ADDRESS                 METHOD

# "local" is for Unix domain socket connections only
local   all             all                                     trust
# IPv4 local connections:
host    all             all             127.0.0.1/32            trust
# IPv6 local connections:
host    all             all             ::1/128                 trust
# Allow replication connections from localhost, by a user with the
# replication privilege.
local   replication     all                                     trust
host    replication     all             127.0.0.1/32            trust
host    replication     all             ::1/128                 trust
下のような感じになります。変更できたら、保存して終了してください。
# TYPE  DATABASE        USER            ADDRESS                 METHOD

# "local" is for Unix domain socket connections only
local   all             all                                     trust
# IPv4 local connections:
host    all             all             127.0.0.1/32            trust
# IPv6 local connections:
host    all             all             ::1/128                 trust
# Allow replication connections from localhost, by a user with the
# replication privilege.
local   replication     all                                     trust
host    replication     all             127.0.0.1/32            trust
host    replication     all             ::1/128                 trust
変更が終わりましたら、PostgreSQLをリロードしておいてください。
# systemctl reload postgresql.serviceファイアウォールでポートを開放する
firewalldを有効にしている場合は、ポートを開放します。
(※パケットフィルタを使用している場合は、そちらで開放してください。)
# firewall-cmd --add-service=postgresql --permanent「success」と表示されたらOKです。
リロードしておきましょう。
# firewall-cmd --reload以上でサーバー側の設定は終了です。
Access側から接続確認
クライアントに戻り、Accessを開いてください。
メニューから「外部データ」→「新しいデータソース」→「他のソースから」→「ODBCデータソース」を選択してください。
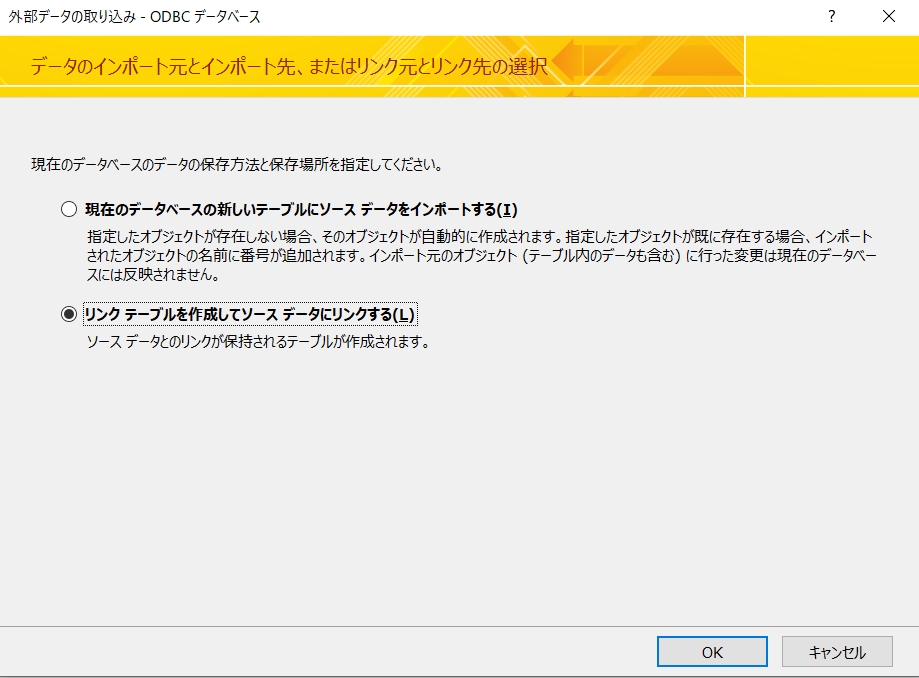
今回はリンクして使用します。「OK」をクリックしてください。
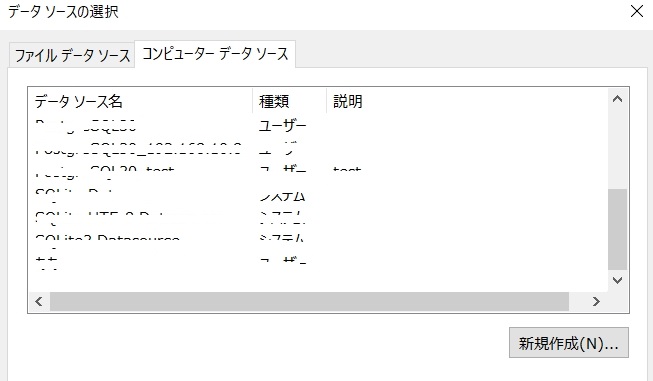
「データソースの選択」画面が開きますので、「コンピューターデータソース」タブの「新規作成」ボタンをクリックしてください。
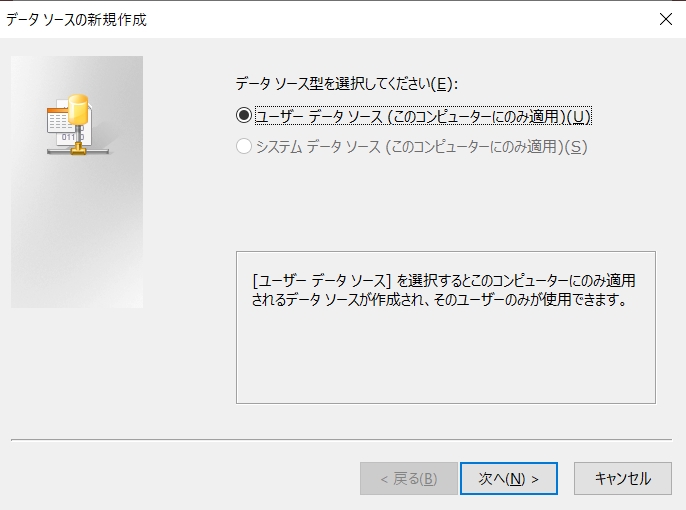
「ユーザーデータソース」を選択して「次へ」をクリックします。
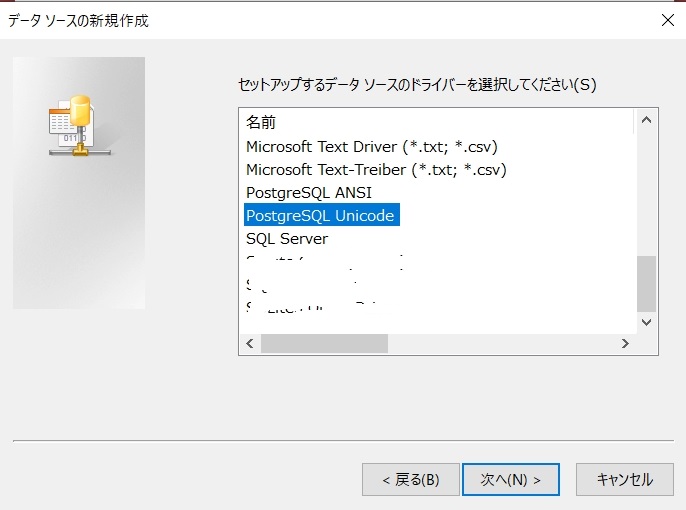
「PostgreSQL Unicode」を選択して「次へ」をクリックします。
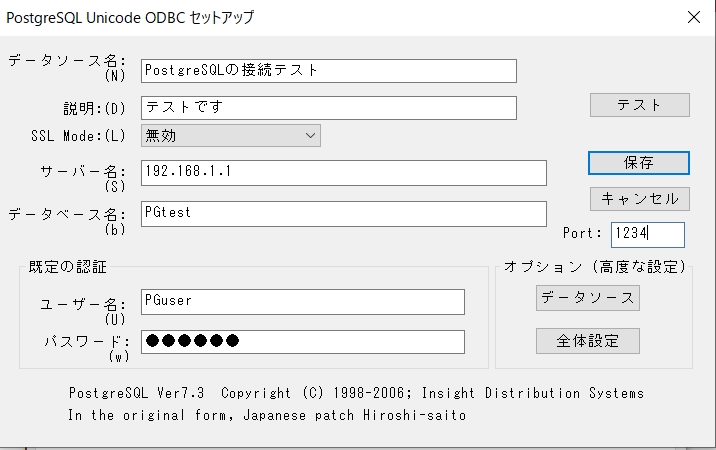
「データソース名」:任意
「説明」:任意
「サーバー名」:VPSサーバーのIPアドレス
「データベース名」:サーバーで作成したデータベース名
「ポート」:PostgreSQL用に開放したポート番号
「ユーザー名」: サーバーで作成したデータベース にアクセスできるユーザー名
「パスワード」:ユーザーのパスワード
各項目を入力後「テスト」ボタンをクリックします。

「Connection successful」と表示されれば完了です。
保存して終了すると、データベースに作成されたテーブルが表示されるので、リンクしたいテーブルを選んでください。

まとめ
いかがでしょうか。クライアントからAccessを使ってサーバーのPostgreSQLテーブルに外部接続をする方法を紹介しました。
やっぱりAccessって便利ですね。
今回紹介した「 pg_hba.conf」の設定では、ちょっとセキュリティ的に問題ありかもしれません。接続するクライアントを特定した方が安心できます。設定方法がわかり次第、修正しようと思います。


コメント